开始使用你的 Bamboo Ink

以下为如何设置 Bamboo Ink,并开始在 Windows Ink(Windows 10 设备上支持触控笔快速简便的功能)环境中使用 Bamboo Ink 的操作简易指南。

A smart stylus for writing, note-taking and annotating, for Windows Ink. Follow these 4 easy steps to set-up your Bamboo Ink. Or see the video here.

选择你的产品

Bamboo Ink second generation image

The newest Bamboo Ink

If you have the newest Bamboo Ink, pictured above, begin your set up by clicking below.

Continue here
Bamboo Ink first generation image

Have an older Bamboo Ink?

If you have the previous generation Bamboo Ink, pictured above, begin your set up by clicking below.

Continue here

设置你的新款 Bamboo Ink


第 1 步:检查你的 Windows 设备

如需检查你的 Windows 设备是否与 Bamboo Ink 兼容,请查看本页所列出的经测试设备列表。

为获得更好的使用体验,建议升级你的 Windows 设备驱动。点击此处,下载 “Bamboo Ink 触控笔” 至你的设备。请根据屏幕指示进行操作。

第 2 步:安装电池

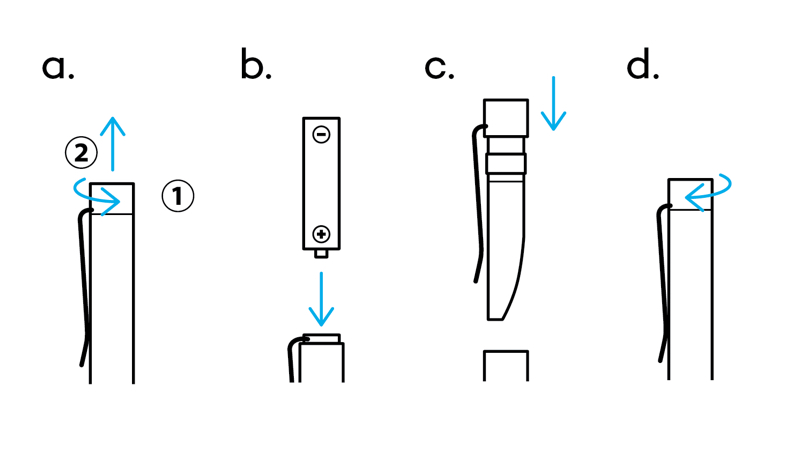
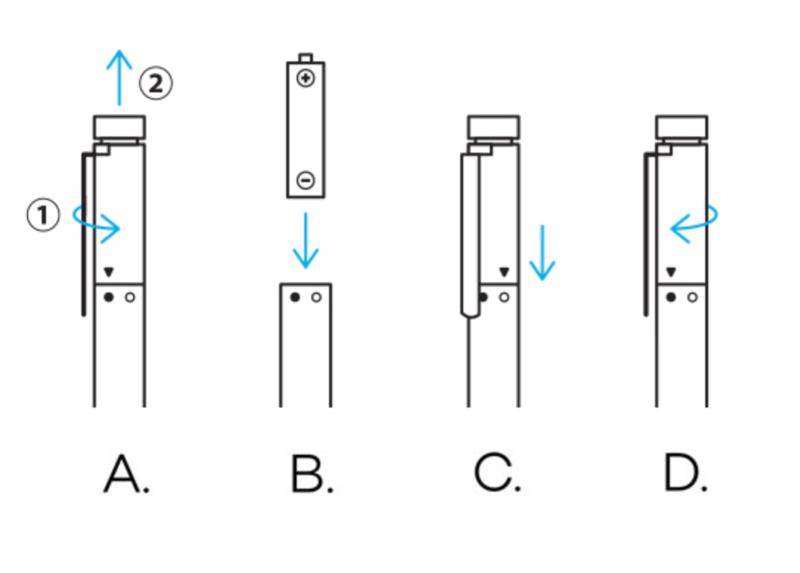
旋拧 Bamboo Ink 顶端电池盖。按照指示打开并放入电池,然后旋拧闭合顶端电池盖。

请确定放入电池时让电池的“-”端(负极)朝上。

第 3 步:笔侧按键

请按下列指示设置笔侧按键。
A:右击
B:橡皮擦*依应用程序而定

第 4 步:更改协议设置

Bamboo Ink 支持两种协议。触控笔需与 Windows 设备的协议相配。若在设备上使用触控笔无响应,你可轻松切换协议。

同时按住两颗笔侧按键两秒钟,即可切换协议。若返回先前协议,重复步骤即可。


设置你的上一代 Bamboo Ink


第 1 步:检查你的 Windows 设备

如需检查你的 Windows 设备是否与 Bamboo Ink 兼容,请查看本页所列出的经测试设备列表。

某些设备需要更新驱动程序。如需确认你的设备是否在此列表之中,请见下列清单。 若你的设备未在列表内,请继续进行第 2 步。 若你的设备在此列表内,请点击此处下载 “Bamboo Ink 触控笔” 驱动程序。将下载的文件保存在你的设备上,然后双击该文件安装驱动程序。请根据屏幕指示进行操作。

  • Dell™ Venue 10 Pro™
    5000 Series (5055) 
  • Fujitsu LIFEBOOK® P727 
  • Fujitsu LIFEBOOK® T937 
  • HP EliteBook x360 1030 G2
  • HP Elite x2 1012 G1 
  • HP Elite x2 1012 G2
  • HP ENVY 8 Note Tablet 
  • HP Pro x2 612 G2
  • Lenovo™ Miix 510 
  • Lenovo™ Miix 720 
  • Lenovo™ ThinkPad®
    10 (2nd Gen)
  • Lenovo™ ThinkPad®
    X1 Tablet
  • Lenovo™ ThinkPad®
    X1 Yoga™
  • Lenovo™ ThinkPad®
    Yoga 260 
  • Toshiba dynaPad N72

第 2 步:安装电池

旋拧 Bamboo Ink 顶端电池盖。按照指示打开并放入电池,然后旋拧闭合顶端电池盖。
第 3 步:选择合适的兼容协议

Bamboo Ink 支持两种兼容协议。协议需与你的 Windows 设备协议相配。若在设备上使用触控笔无响应,你可轻松切换协议。

按下并按住两侧按键两秒钟,即可切换协议。若返回先前协议,重复步骤即可。

第 4 步:将触控笔与你的设备配对

1. 在 Windows 10 桌面上点击“开始”菜单,选择“设置”,选择“设备”,选定蓝牙并开启。

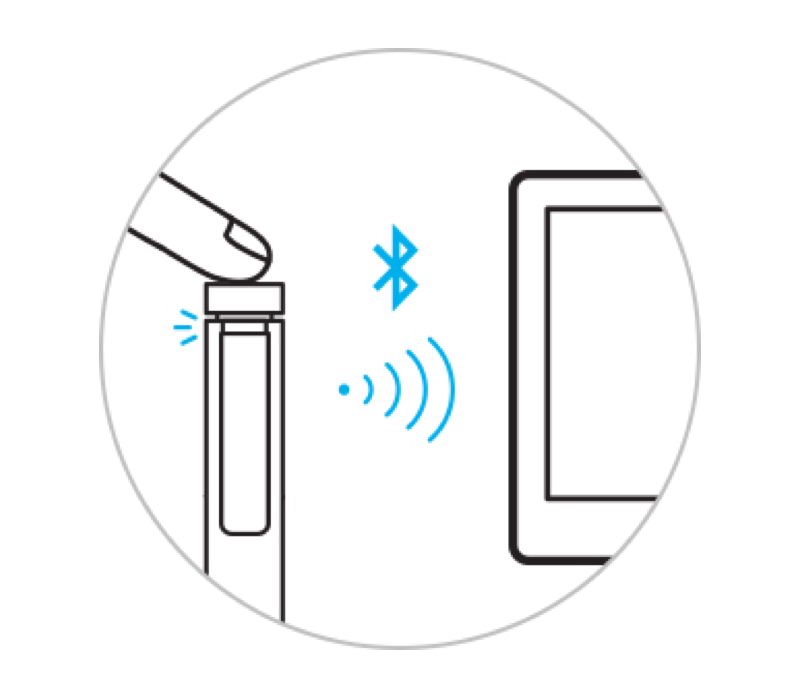
2. 现在拿起 Bamboo Ink,按住顶部按键六秒钟——直至 LED 灯开始闪烁为止。

3. 从已发现的设备列表中选择 Bamboo Ink,然后选择配对。
第 5 步:启动 Windows Ink 工作区和应用程序

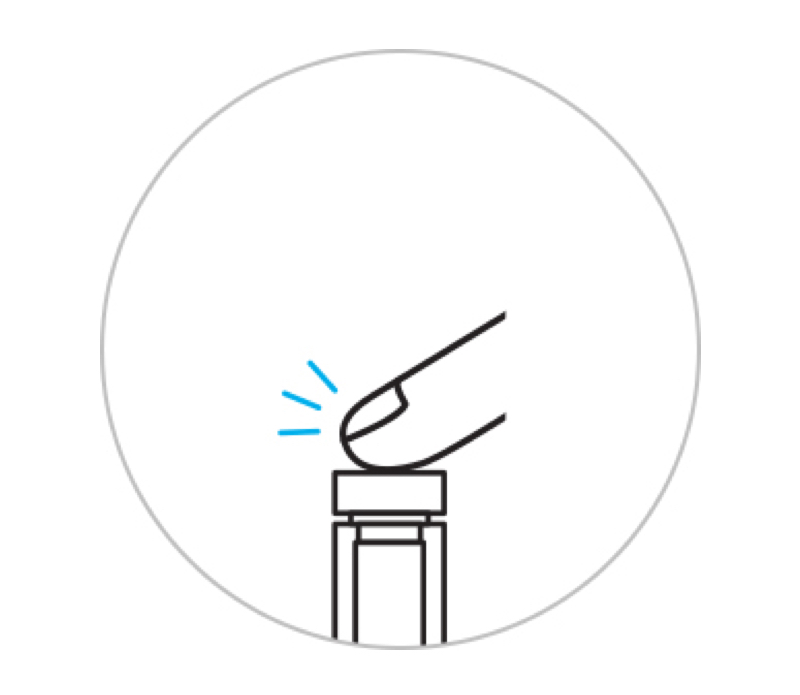
按下顶部按键以快速启动 Windows Ink 工作区。

双击顶部按键开启屏幕草图功能。

按下并按住顶部按键开启便笺功能。

请在方便时更改默认设置。请至“开始”菜单,选择“设置”,然后选择“设备”并在“笔和 Windows Ink”中自定义你的 Bamboo Ink 的功能。


现在,Bamboo Ink 已备妥可用。你亦可根据自身需求对其进行调整。

为你青睐的运笔体验选择适用的笔尖


配件(另售):笔尖套装——柔软、中等与坚硬笔尖,选择适合你工作方式的工具。
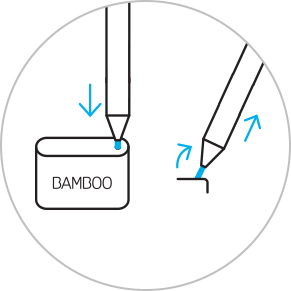

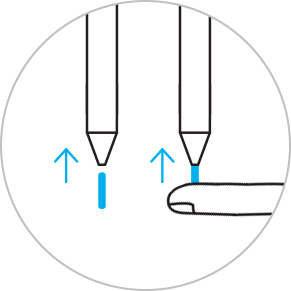
To exchange the current nib, stick it into the small hole in the built-in nib remover of the nib kit. Tilt the stylus and remove the nib.


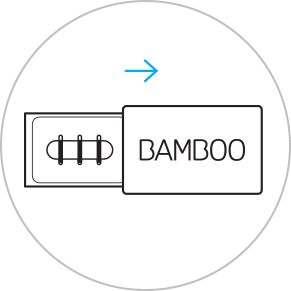
Slide to open the nib kit and choose from left to right: firm (black), medium (gray) or soft (black).


Press up gently to install the nib of your choice. Make sure the nib is resting properly.

See the video here

查看为触控笔优化的应用程序


Windows Ink

Sticky Notes, sketchpad, screen sketch: The Windows Ink Workspace comes with three pre-installed apps that help you set your ideas in motion with your Bamboo Ink.


Bamboo Paper

Bamboo Paper turns your device into a paper notebook. Capture your thoughts and ideas, notes, sketches and drawings as straightforward and easy as in a real paper notebook.

Learn more about Bamboo Paper ::before ::after

Wacom 产品的清洁建议和指南

将 70% 或 75% 含量的异丙醇(外用酒精)倒在柔软的无绒布上可以安全地清洁所有 Wacom 产品。 用微湿的布轻轻擦拭 Wacom 产品坚固、无开孔表面(如数位屏外屏)或其他外部表面。 切勿使用漂白剂。 避免在任何开口处弄湿,亦勿将 Wacom 产品浸入任何清洁剂中。 有关其他提示,请参阅下面的内容,或联系您当地的Wacom 客服团队

了解更多信息

Accessories

Nib kit for Bamboo Ink

Why not add an accessory kit of three nibs – soft, medium and firm– to change your pen to suit your needs?

Back to top
A+ A-
Support