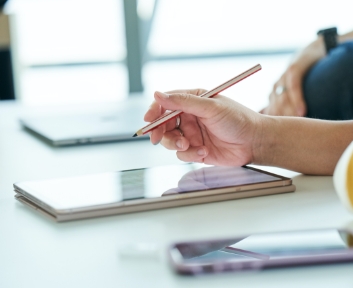


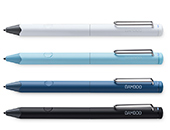


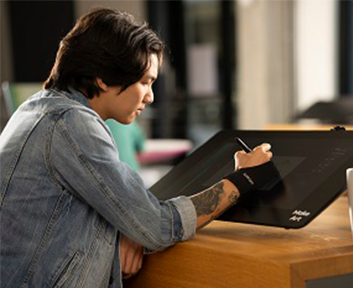
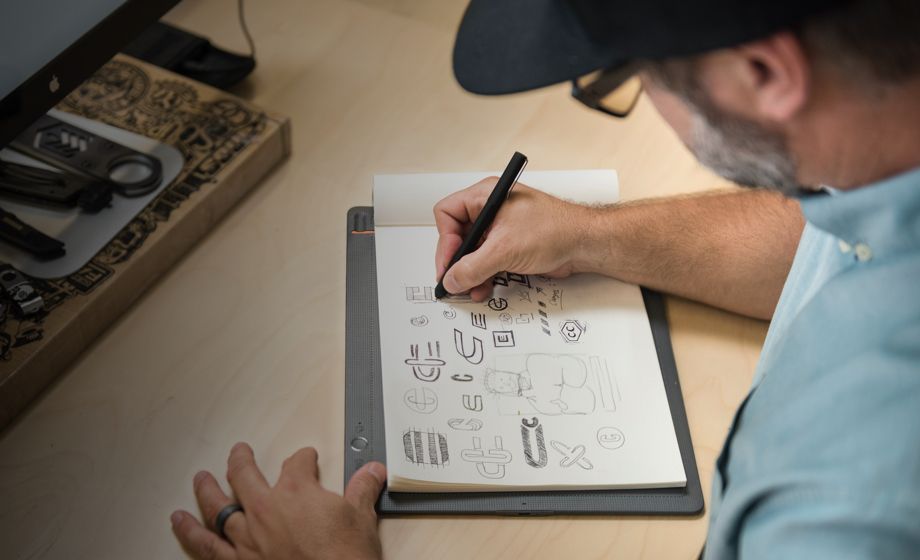
Pen tablets
Sketch, draw and edit images with a responsive pad, a precise pen and see your creations appear on screen.


无论你是否养狗,只要了解正确的步骤,画狗就很简单。
在本教程中,你将学会如何画一只狗。本教程面向初学者,但即使是有经验的艺术家也有可能获得一些新的认识。我们会讲到在电脑或数位板或数位屏上绘画的技巧,但即使你用的是铅笔和纸,也同样可以按照这些步骤绘画。
所以,拿起你的绘画工具,我们开始吧!


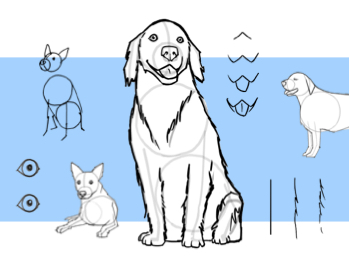
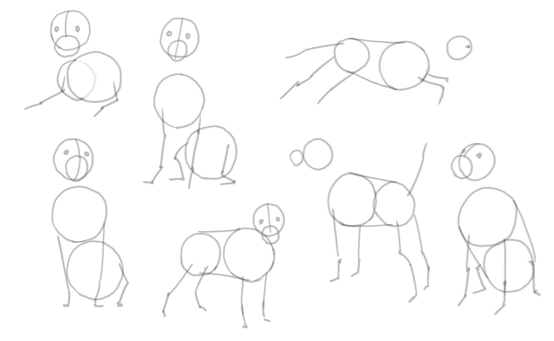
To understand how best to draw something, it’s always helpful to reduce the image to some basic forms. Getting the size and position of these forms right helps achieve the correct proportions.
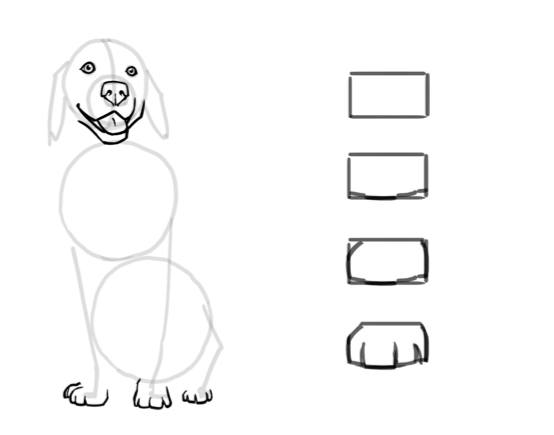
In the case of a dog, we can reduce it to three circles. The bottom two circles will form the body and the top circle will form the face.
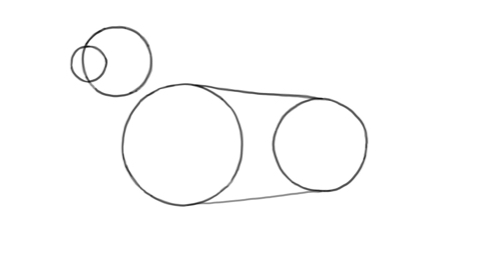
Add another smaller circle to the top circle – this will form the dog’s muzzle. Then connect the two bottom circles to form the dog’s body. Use one line to connect the top of the circles and another to join the bottom, as shown here.
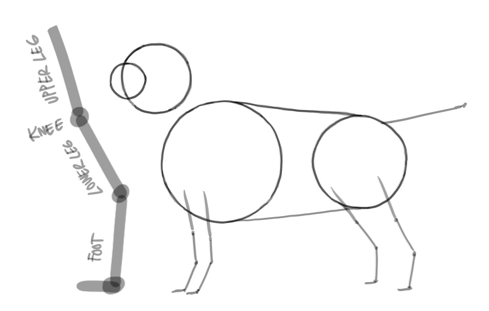
Now it’s time to add the legs – two coming from the front circle and two from the back. It’s important to remember that the proportions of dog legs are different to human ones. Use the guide pictured here to make sure you have the joints in the right position. Make sure that the position of the legs is correct and that they face the right direction and that all the joints bend the right way.
At this stage you can also add the tail. Simply draw a straight line at a slight upward angle from the top of the rear circle.
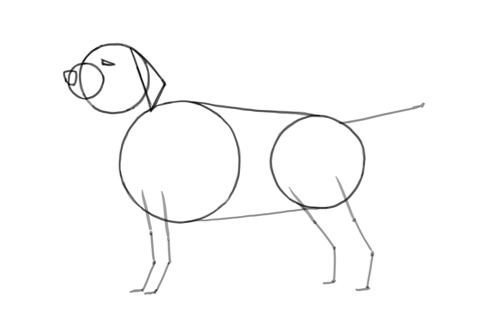
To form the dog’s face, we need to add the nose, eyes and ears. As we’re drawing the dog in profile, you only need to add one of each. Sketch the eye using a lying-down V shape. Use a triangle for the ear. Then use a circle or square for the nose. For now the most important thing is getting the size and position of these details correct.

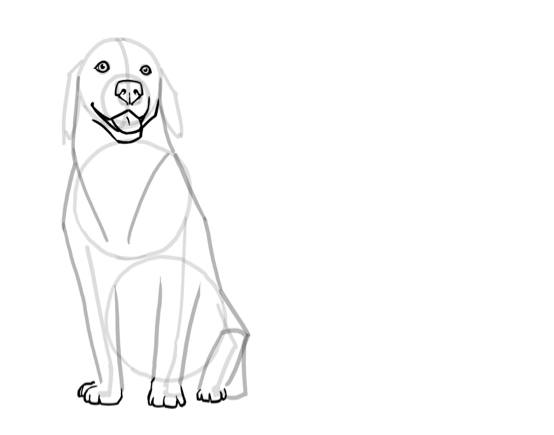
现在我们可以开始勾勒狗狗的身体和特征了。如果你用纸笔绘画,请选用较深色、较软质的笔或铅笔。如果你使用的是数字设备,建议打开一个新的绘画图层,并将目前所画的草图调至半透明。
可以将以下两种技巧结合起来,更好地勾画出轮廓。在身体顶部使用正常的线条。然后,为了营造出底部的真实感,可用排线让毛发不像顶部那样平铺。
对于胸腹部位,将初步草图中的圆稍作调整就能得到合适的体型。前额、嘴部和鼻部可以连接起来,形成连续的形状。然后,为了增加腿部厚度,在之前画的草稿线两侧勾画出轮廓。记住:腿的顶部往往会更粗。

我们还要画出较远的两条腿。从侧面看,成对的两条腿几乎完全一样。需要注意的是,狗的后腿往往比前腿分得更开一些。
在这个阶段,我们还可以细化嘴部。喜欢的话,也可以把狗狗画成吐着舌头流口水的样子。

Using the steps above, you can draw dogs in all sorts of poses. The first step is to position the circles correctly. With a little practice, you’ll get the hang of finding the best proportions and spacing for them.
As before, pay attention to the joints and their alignment when pre-drawing the legs. When you draw in the central axis of the head, it’s easier to determine the correct positions for the eyes and muzzle, especially if you want to depict the dog in half profile.
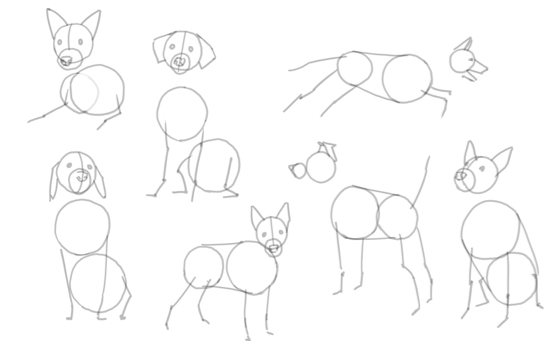
For now, you can roughly indicate the position of the nostrils on the dog’s nose. We’ll go into more detail on this later.
The basic shape for a dog’s ear is a triangle but for certain poses, this doesn’t work. Other basic shapes are useful as a starting point but you’ll need to adjust these on a case-by-case basis. Take a look at these different ways of doing it.
Keep in mind that a dog’s ears are an essential part of its expression. Erect ears suggest alertness or even aggression. If you want your dog to be relaxed, you should let the ears hang.
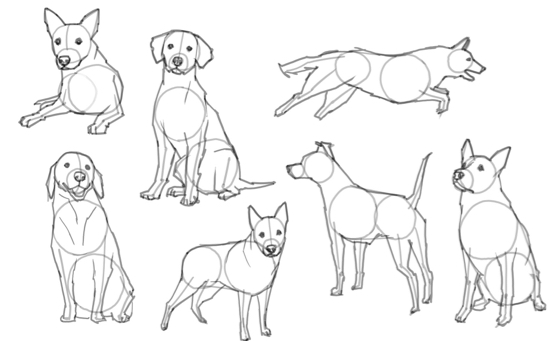
For the quick, sketchy style depicted, you can roughly trace the preliminary drawing with the outlines, then add hair with the help of quick zigzag lines.
Depending on the pose and perspective, you’ll need to vary how you draw different parts of the body, bulges and indentations, bones, muscles, wrinkles, etc. You can often work out the right places for them using your imagination. Sometimes you might need to take a closer look at the anatomy of a dog.
By using the simple steps described here, you can get pretty far in most cases. As with any subject, the best way to capture it most accurately is to draw directly from a living model.

在这个阶段,我们要画一只处于放松姿势的狗狗。就按照金毛犬的样子来画。

狗的眼睛比人的眼睛更圆。所以先画个圆,在很靠近圆圈的地方加上眼皮。在圆心处画出瞳孔。对于反光效果,可以在稍微偏向顶部的地方添加一个光点。如果使用铅笔,在画之前要先考虑好光点,或者准备好橡皮擦。

狗的鼻子是一个相当复杂的结构,带有凸起和褶皱。在此介绍从正面构造狗狗鼻子的简单流程:
1. 先画出宽大的方形,比例类似横向 A4 纸。将它在横竖方向各切一半。(上半部分的竖直分割线并不重要。)
2. 将鼻孔定位在水平中线上,每个鼻孔都在距中点一半距离的地方。在侧面距顶部四分之三距离处画一道斜向下的标记。
3. 稍稍圆化边缘。
4. 用蜗牛的形状将四分之三距离的标记与鼻孔连接起来。在底部的中间位置画一个 V 形。
5. 用曲线将 V 形与上半部分连接起来。鼻孔也在两侧略微倾斜,朝向 5 点钟方向(右侧)和 7 点钟方向(左侧)。
6. 除了从中心点向下的竖直辅助线之外,去掉其他引导线。
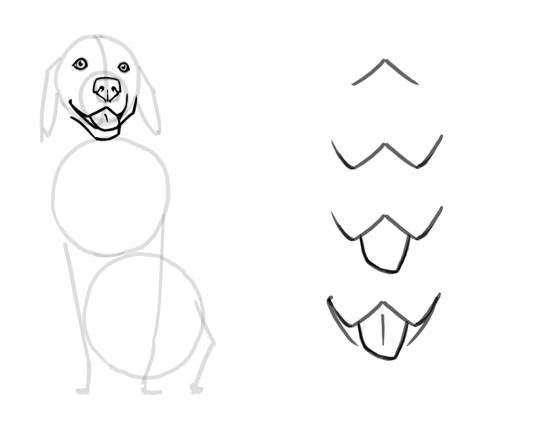
From the front, the muzzle looks like a W. In this drawing, the dog is looking slightly to the right, so the right side of the W should be a bit narrower than the left. The tongue comes out directly under the W and hangs out over the lower lip.
For the paws, you can again start with a basic shape. This time, use a slightly wider square than for the nose. Offset the bottom edges of the four toes very slightly in height to give the paws some depth. You can then give the toes more definition by adding spaces.
Now it’s time to make the preliminary drawing a continuous shape. The neck goes directly into the body. Below the neck, Golden Retrievers have a kind of collar. At the top of the front legs, there are shoulders on both sides, which mark the transition from leg to body. So in this simplified form, use subtle corners on the outer lines, at about the level of the collar.
For the moment the outlines can still be smooth connecting lines. They help us for the next step.
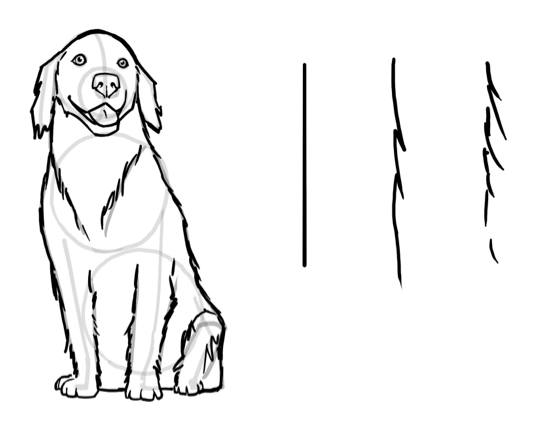
As before with the standing dog, you can indicate fur in the outlines with quick hatching strokes. This softens the hard edges of the outlines and gives the dog its fluffiness.


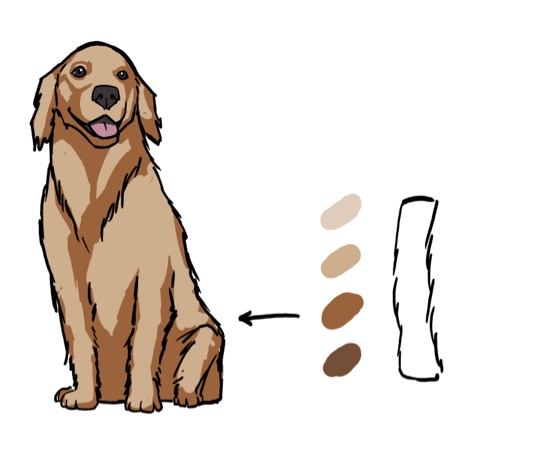
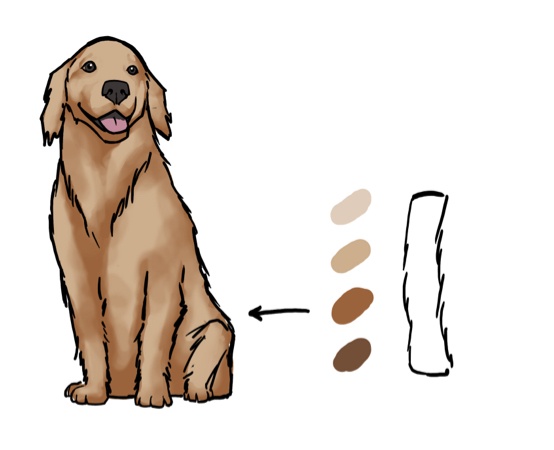
数字化工作的优势之一是可以使用大量的色调。取决于不同软件和不同艺术家,上色流程有很多种。可以选择调整每个单独色调的填充级别。这样就可在之后调整和改变每一种颜色。
对于这只狗,我们至少需要六种色调。我们要用到四种棕色作为毛色:一种基础色,两种深色渐变色作为阴影,一种浅色渐变色作为明亮区域。我们还可以用浅粉色来表现舌头,用很深的棕色来表现眼睛、鼻子和嘴部投在舌头上的阴影。
你不必限制自己,也可以使用更多色调。但建议先从规模可控的调色盘开始,有必要时再扩大调色盘。
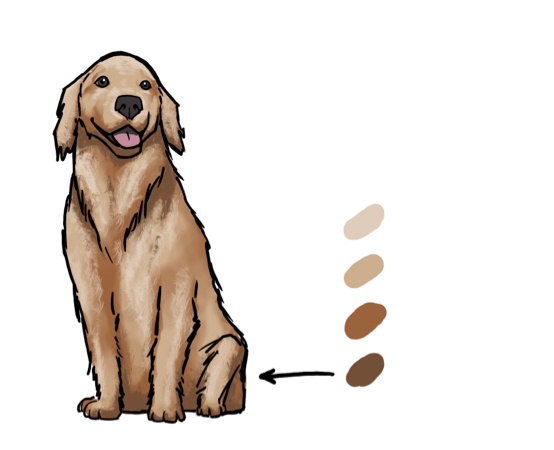
With the lighter of the two shading browns, you can roughly define some shadow areas. Try to imagine which areas are directly illuminated by the light and which are in shadow. Also think about whether parts of the body cast shadows on other areas. In this case, we’ll assume that the light comes from above, so the lower edges of the body parts tend to be in shadow.
You can also highlight the muzzle, eyes and cheeks a bit, and in some places you can make fur markings for the pattern in the dog's coat.
This dog has a soft coat, so we want to achieve that effect in the drawing. To get the effect pictured here, soften the shading with a 0% soft pencil outer edge. If you’re using pencil on paper, you can use an estompe for this technique to get more accurate smudging than using your fingers. Blurring has the effect of making the basic tone of the dog look as soft as possible.

Now, let’s work with the light brown tone on the upper edges of the body parts. With the two hard brown tones (i.e. very light and very dark) we can create the impression of fur. You can build a fur brush for this purpose. So instead of a line (i.e. many dots stuck together), it draws lots of hairs at random – smaller, larger or even slightly twisted. Most graphic programs offer brush presets but you can also create a brush like this yourself quite easily. All you have to do is paint a single hair and adjust the settings. The alternative is to draw the fur using skillful hatching or drawing lots of hairs.
To give the dog a little more depth of color, work the darkest parts with the very dark brown tone using the fur technique above. By this point, you’ll be able to tell whether the individual shades go well together. If you’ve worked with fill levels, you can always readjust the shades and gradations.

你可爱的狗狗现在就完成了。可以按照你的风格为狗狗添加更多细节。既可以保持偏向素描的风格,也可以将细节水平提升到照片级别的写实感。
希望你喜欢这套流程,学得开心。画画的方法多种多样,所以既要有自己的想法,也要不断从他人身上汲取灵感。
祝你画得开心,下次教程再见!
Wacom One creates a familiar pen-on-paper feeling, thanks to a 13.3” screen with natural surface friction and minimal reflection. The pen feels light and natural in your hand and transforms into a pencil, paintbrush or chalk in your selected software. All you need for drawing realistic dogs. Creative software comes included, along with the ability to connect to your computer, as well as certain Android devices.

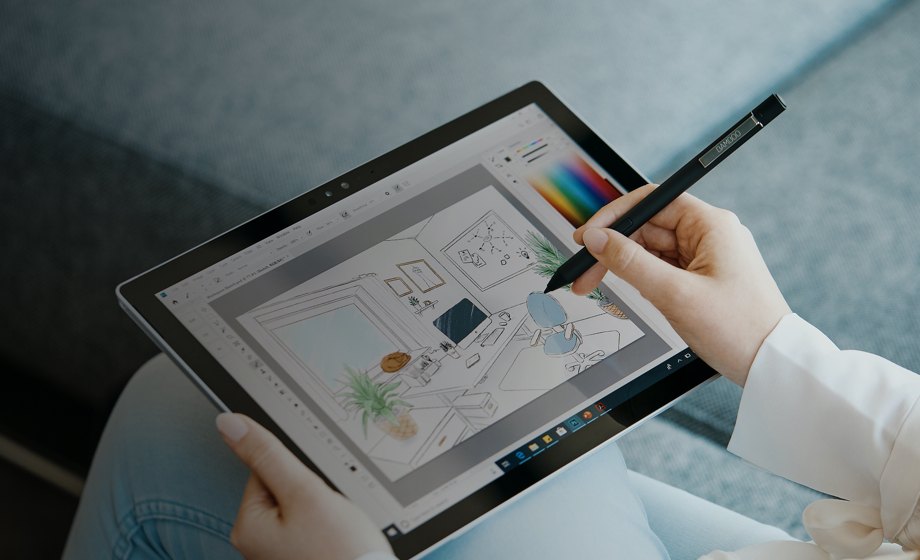
Wacom One 13 pen display
Draw, design and create directly on a high resolution screen with a precise pen.
Sketch, draw and edit images with a responsive pad, a precise pen and see your creations appear on screen.
Draw, design and create directly on a high resolution screen with a precise pen.
Wacom’s vision is to bring people and technology closer together through natural interface technologies. This has made it the world’s leading manufacturer of interactive pen tablets and displays as well as of digital styli and solutions for saving and processing digital signatures. The advanced technology of Wacom’s intuitive input devices has been used to create some of the most exciting digital art, films, special effects, fashion and designs around the world and provides business and home users with their leading interface technology to express their personality. Founded in 1983, Wacom is a global company based in Japan (Tokyo Stock Exchange 6727) with subsidiaries and affiliate offices around the world to support marketing and distribution in over 150 countries.